If you want to handle different Dynamics NAV Server versions, ServiceTierAdministration is the way. No doubt about it.
You may download it from Mibuso: https://mibuso.com/downloads/service-tier-administration-tool
But you can do it using Windows sc command and/or hacking the Windows registry.
So let’s learn how to do it by examples:
1. How to create a new service instance named NewServer
Existing Dynamics NAV Service: DynamicsNAV100
Path: C:\Program Files\Microsoft Dynamics NAV\100\Service
Create a new directory named Instances with a subdirectory to store the new instance configuration files.
New path example: C:\Program Files\Microsoft Dynamics NAV\100\Instances\NewServer
Now create two .config files:
NewServer.config
<configuration>
<appSettings file=”C:\Program Files\Microsoft Dynamics NAV\100\Instances\NewServer\CustomSettings.config” />
</configuration>
CustomSettings.config
You can copy CustomSettings.config file from the C:\Program Files\Microsoft Dynamics NAV\100\Service and paste it in the new path and update it as necessary. Below the tags I had to update are in bold.
<?xml version=”1.0″ encoding=”utf-8″?>
<appSettings>
<add key=”NetworkProtocol” value=”Default” />
<add key=”DatabaseServer” value=”<your sql server address>” />
<add key=”DatabaseInstance” value=”<your sql instance, if used>” />
<add key=”DatabaseName” value=”NAV2017_W1_CU16″ />
<add key=”EnableSqlConnectionEncryption” value=”False” />
<add key=”TrustSQLServerCertificate” value=”False” />
<add key=”ServerInstance” value=”NewServer” />
<add key=”ClientServicesPort” value=”50109″ />
<add key=”SOAPServicesPort” value=”50209″ />
<add key=”ODataServicesPort” value=”50309″ />
<add key=”ManagementServicesPort” value=”50009″ />
<add key=”ManagementServicesEnabled” value=”True” />
<add key=”ClientServicesEnabled” value=”True” />
……
</appSettings>
After creating the config files, let’s create the Windows service. Open a new command-line window in administrator mode (otherwise you’ll get an Access is denied error) and enter:
sc create MicrosoftDynamicsNavServer$NewServer binPath=”\”C:\Program Files\Microsoft Dynamics NAV\100\Service\Microsoft.Dynamics.Nav.Server.exe\” $NewServer /config \”C:\Program Files\Microsoft Dynamics NAV\100\Instances\NewServer\NewServer.config\”” DisplayName=”Microsoft Dynamics NAV Server [NewServer]” error=ignore depend=HTTP obj=”NT AUTHORITY\NETWORK SERVICE”
More info about sc: https://support.microsoft.com/en-us/help/251192/how-to-create-a-windows-service-by-using-sc-exe
Note: Quotes (“) in paths must be escaped with back slash (\)
If the service has been created successfully, you’ll see the message “[SC] CreateService SUCCESS”.
If you run the service with the Network Service credentials, you may see the following error in the Event Log when starting the service:
Application: Microsoft.Dynamics.Nav.Server.exe
Framework Version: v4.0.30319
Description: The application requested process termination through System.Environment.FailFast(string message).
Message: The service could not write to the EventLog because of: ‘The source was not found, but some or all event logs could not be searched. To create the source, you need permission to read all event logs to make sure that the new source name is unique. Inaccessible logs: Security.’.
The original message is: ‘Server instance: NewServer
If this happens, you can manually add the following key in the Windows Registry or you can give permissions to the user to update the registry (this way, when running the service, the correct keys in Windows Registry will be automatically added):
Adding Windows Registry Key
Add the following key in Windows Registry so that this new service is able to add events in Event Log:
HKEY_LOCAL_MACHINE\SYSTEM\CurrentControlSet\Services\EventLog\Application\MicrosoftDynamicsNavServer$NewServer
And add String Key named: EventMessageFile

If you prefer, you can create a new .reg file with the following content and run it:
Windows Registry Editor Version 5.00
[HKEY_LOCAL_MACHINE\SYSTEM\CurrentControlSet\Services\EventLog\Application\MicrosoftDynamicsNavServer$NewServer]
@=””
“EventMessageFile”=hex(2):43,00,3a,00,5c,00,57,00,69,00,6e,00,64,00,6f,00,77,\
00,73,00,5c,00,4d,00,69,00,63,00,72,00,6f,00,73,00,6f,00,66,00,74,00,2e,00,\
4e,00,45,00,54,00,5c,00,46,00,72,00,61,00,6d,00,65,00,77,00,6f,00,72,00,6b,\
00,5c,00,76,00,32,00,2e,00,30,00,2e,00,35,00,30,00,37,00,32,00,37,00,5c,00,\
45,00,76,00,65,00,6e,00,74,00,4c,00,6f,00,67,00,4d,00,65,00,73,00,73,00,61,\
00,67,00,65,00,73,00,2e,00,64,00,6c,00,6c,00,00,00
Setting Windows Registry Permissions
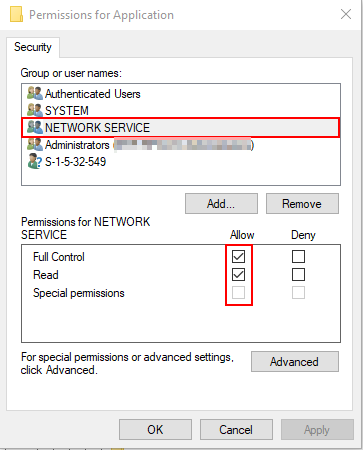
Alternatively, you may give permissions to Network Service user to update Windows Registry:
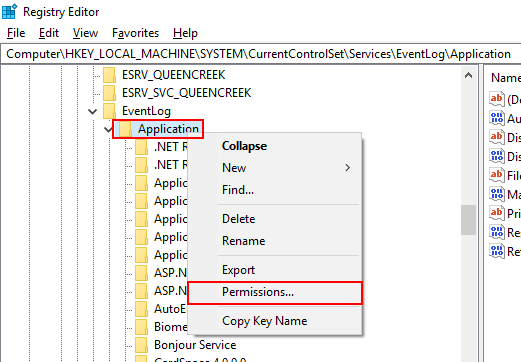
HKEY_LOCAL_MACHINE\SYSTEM\CurrentControlSet\Services\EventLog\Application
Right click the Application key.
Now you just need to run the service, either using ServiceTierAdministration tool, Dynamics NAV Administration tool or Windows Services applet.
2. How to rename an existing service instance named NewServer to NewNavServer
Stop the service.
Rename the instance directory name from NewServer to NewNavServer and rename the .config file from NewServer to NewNavServer, to keep it consistent:
Old path/file name: C:\Program Files\Microsoft Dynamics NAV\100\Instances\NewServer\NewServer.config
New path/file name: C:\Program Files\Microsoft Dynamics NAV\100\Instances\NewNavServer\NewNavServer.config
Update the NewNavServer.config file:
<configuration>
<appSettings file=”C:\Program Files\Microsoft Dynamics NAV\100\Instances\NewNavServer\CustomSettings.config” />
</configuration>
Update the CustomSettings.config file with the new service name:
<?xml version=”1.0″ encoding=”utf-8″?>
<appSettings>
<add key=”NetworkProtocol” value=”Default” />
<add key=”DatabaseServer” value=”<your sql server address>” />
<add key=”DatabaseInstance” value=”<your sql instance, if used>” />
<add key=”DatabaseName” value=”NAV2017_W1_CU16″ />
<add key=”EnableSqlConnectionEncryption” value=”False” />
<add key=”TrustSQLServerCertificate” value=”False” />
<add key=”ServerInstance” value=”NewNavServer” />
<add key=”ClientServicesPort” value=”50109″ />
<add key=”SOAPServicesPort” value=”50209″ />
<add key=”ODataServicesPort” value=”50309″ />
<add key=”ManagementServicesPort” value=”50009″ />
<add key=”ManagementServicesEnabled” value=”True” />
<add key=”ClientServicesEnabled” value=”True” />
<add key=”ReportPDFFontEmbedding” value=”True” />
……
</appSettings>
Now rename the service name. This can be done following one of these two steps:
1. Via Windows Registry
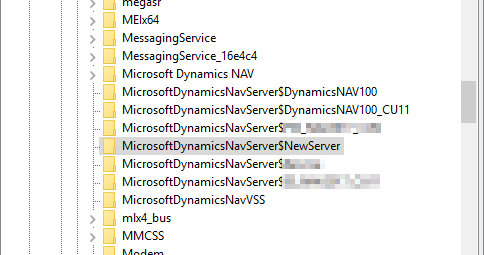
Open Windows Registry Editor, access the path and rename the service name:
Path: HKEY_LOCAL_MACHINE\SYSTEM\CurrentControlSet\Services\MicrosoftDynamicsNavServer$NewServer
Rename Key: MicrosoftDynamicsNavServer$NewServer
To: MicrosoftDynamicsNavServer$NewNavServer
Change the DisplayName:
From: Microsoft Dynamics NAV Server [NewServer]
To: Microsoft Dynamics NAV Server [NewNavServer]
Change the ImagePath:
From: “C:\Program Files\Microsoft Dynamics NAV\100\Service\Microsoft.Dynamics.Nav.Server.exe” $NewServer /config “C:\Program Files\Microsoft Dynamics NAV\100\Instances\NewServer\NewServer.config”
To: “C:\Program Files\Microsoft Dynamics NAV\100\Service\Microsoft.Dynamics.Nav.Server.exe” $NewNavServer /config “C:\Program Files\Microsoft Dynamics NAV\100\Instances\NewNavServer\NewNavServer.config”
Restart the machine so changes take effect.
2. Recreate the Dynamics NAV Server
Remove the existing service:
sc delete MicrosoftDynamicsNavServer$NewServer
If successfully deleted, you’ll get the message “[SC] DeleteService SUCCESS”
Recreate the new service.
Open a new command-line window in administrator mode (otherwise you’ll get an Access is denied error) and enter:
sc create MicrosoftDynamicsNavServer$NewNavServer binPath=”\”C:\Program Files\Microsoft Dynamics NAV\100\Service\Microsoft.Dynamics.Nav.Server.exe\” $NewNavServer /config \”C:\Program Files\Microsoft Dynamics NAV\100\Instances\NewNavServer\NewNavServer.config\”” DisplayName=”Microsoft Dynamics NAV Server [NewNavServer]” error=ignore depend=HTTP obj=”NT AUTHORITY\NETWORK SERVICE”
If the service has been created successfully, you’ll see the message “[SC] CreateService SUCCESS”.
After renaming the service name, if the user running the service doesn’t have permission to update the registry, you need to rename the key in Windows Registry so that the renamed service is able to add events in Event Log. To do it, you have to rename the following key:
From: HKEY_LOCAL_MACHINE\SYSTEM\CurrentControlSet\Services\EventLog\Application\MicrosoftDynamicsNavServer$NewServer
To: HKEY_LOCAL_MACHINE\SYSTEM\CurrentControlSet\Services\EventLog\Application\MicrosoftDynamicsNavServer$NewNavServer
Now you just need to run the service, either using ServiceTierAdministration tool, Dynamics NAV Administration tool or Windows Services applet.